Rendering a Preview: Playblast | Selecting what to Preview | Matching Film Gate | Save to Movie File | Help, no QuickTime on PC!
Rendering a preview: Playblast
To view your animation in order to evaluate movement and timing, you have to set the playback settings to “real-time”
If your scene is more complicated than your hardware can handle at 24 (or 30) frames per second, frames will be dropped (skipped). To make sure you view all frames in real time you can render a preview. In Maya this is called a Playblast.
Playblast can be found under the Window menu, make sure to hit the option box.
On the windows platform, you can set the format to AVI will open the resulting animation in Windows Media Player, I prefer to select iff and view the animation in Fcheck (Maya’s native player). Quicktime also works (choose qt as the Format) if installed, but is no longer supported. See Save to Movie File and Help, no QuickTime on PC! below.

Selecting what to Preview
You can select what is included in the playblast to be different from what is currently shown in you panel via the panel menu: View > Playblast Display
Via Display > Heads Up Display, you can choose a number of things to show, like Frame Number
Matching the Film Gate
When rendering a playblast you want to use in editing, you want to create it with the same frame size as you will be rendering a, and make the framing match the film gate.
Display Size should be set to From Render Settings and the Scale to 1 (or .5 if you want half res.)
The panel you are creating the playblast from needs to have at least the dimensions of the requested render or it will scale to fit the size of the panel. To create a playblast that is larger than your panel, check Render Offscreen
In your CameraShape Properties the following settings are required:
- Film Back → Film Aspect Ration needs to match the Render Settings → Common → Image Size → Device aspect ration
- Film Back → Fit Resolutions Gate needs to be set to Overscan
- Display Options → Overscan needs to be set to 1.000
Saving a Playblast directly to a movie file
You can choose to save the Playblast wherever you want. At the bottom of the PLayblast Options window, choose Save to File and choose your file location.
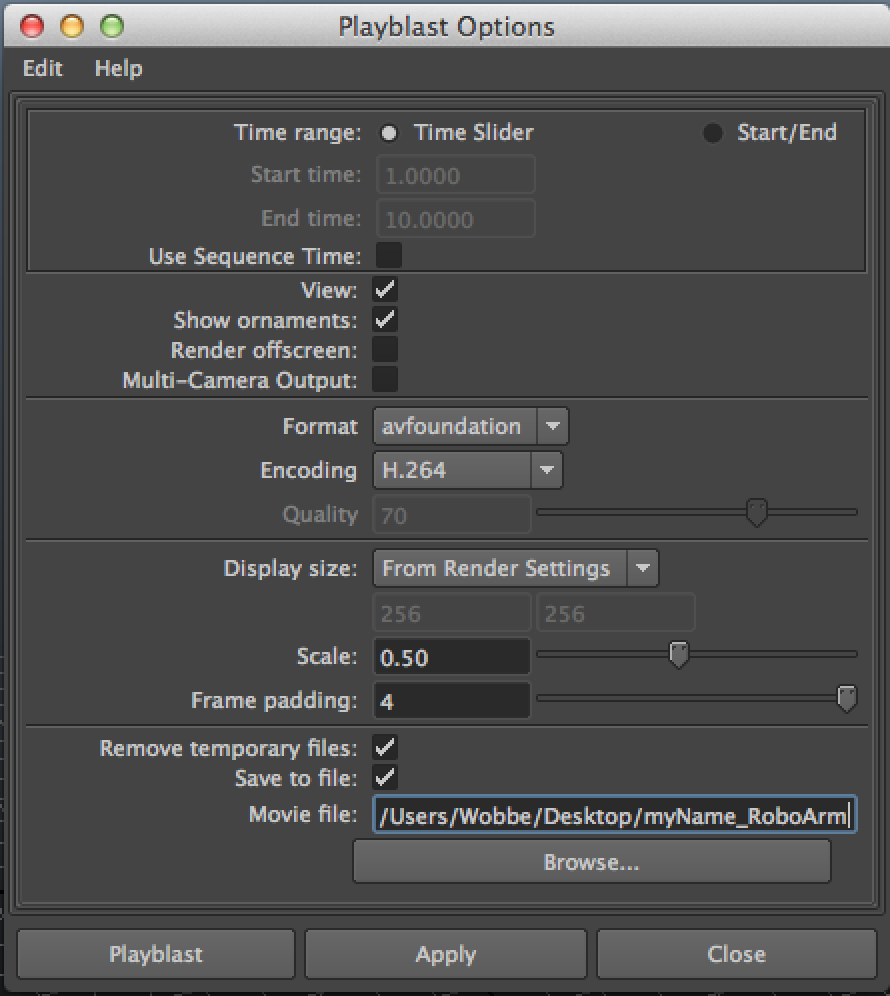
To save your movie as a Quicktime movie with H264 compression, choose the fllowing Playblast options:
- Show Ornaments: check if you want the Heads Up Display to be included in the render (see Selecting what to Preview)
- Format: avfoundation (on a Mac) or qt (Windows – if installed)
- No, “avfoundation” does not make any sense to me either but seems to mean “Quicktime Movie”
- If Quicktime is not available in Windows, like in our labs, choose AVI and read on at Help, no QuickTime on PC!
- Encoding: H264
- To get the playblast to match your render settings (see also Matching Film Gate):
- Display Size: From Render Settings
- Scale: .5 gets you half of the render settings size (e.g. 640×360 for HD720)
- Check “Save to File”
Help, no QuickTime on PC!

Unfortunately, there are few codecs available for AVI on Windows in Maya. Choosing None will result in a huge uncompressed movie, and thus excellent image quality. Choosing |YUV works well, and results in mildly huge files. You need to compress them in a separate step to limit the file size
You can convert the movie using Premiere or Handbrake.
- Open Premiere, and import the playblast movie (.avi)
- With the clip selected in the project window, got to File > Export > Media and choose H264 as output format. You want to uncheck export audio
Or, alternatively:
- Open HandBrake
- Drag the playblast movie (.avi) into it, or open it in Handbrake
- Choose a good preset, make sure to set the frame rate to 24 (unless you are animating at a different frame rate like 30fps)
- Even if your playblast is smaller that full HD, you can choose a H264 1080p preset, by default the movie will not be scaled up but retain its image size
- Set your destination and your mother’s brother is called Robert
