
There are several scripts out there that let you create a rig for your character in a more or less automated way. The only free one that I found that actually works in Maya 2011+ is DSN Rapid Rig. There are two version: the basic and free one and the full version which of course is not free. Luckily the basic version provides enough functionality for us.You can download the MEL script from Creative Crash
Loading the script
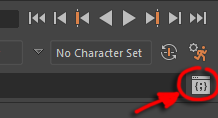
After un-zipping the downloaded archive file, you can load the .mel file in your script editor. Open the script editor by clicking on the script editor icon located on the lower right of the Maya interface
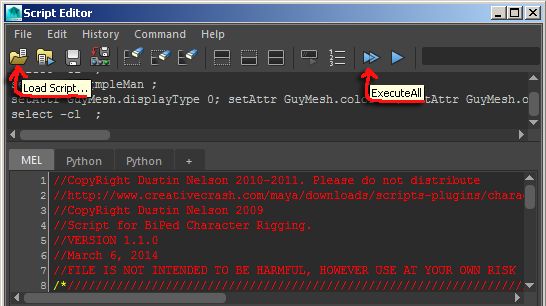
Make sure the MEL tab is active (which is the default, the Python tab is for scripts written in, you guessed it, Python)
Load the script by clicking on the button indicated in the image or by choosing file > Load Script…
To run the script click on the double blue triangles that look like a fast forward button (see image above). The interface should pop up.
(The following instructions are based on those provided on Creative Crash.)
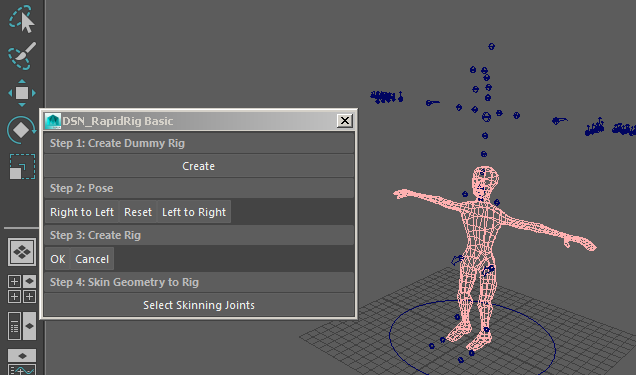
To use the script, follow each step in the interface.
Step 1
Create the dummy rig for positioning the joints in your character
Start by scaling the main circle to get the rig the correct size
Adjust the positions of the dummy joints to line up with your character
The first minute of this tutorial video for the Advanced Rapid Rig can give you some inspiration on how to move the joints in place
Step 2
Use the buttons to mirror the pose of the character if it is symmetrical, this way you only have to set up one side
Reset the rig if you want to start over
When referring to the Left and Right sides, this is the character’s left and right.
Eg. mirror left arm and leg to right arm and leg
Now is a good time to save your scene!
If the rig does not turn out quite OK because of the joint positions you chose, you can go back to this version (which you clearly named “MyCharacter_DummyJointsPlaced.00.mb”) and improve the positions of the dummy joints. You cannot run the same step of the script on the same scene more than once!
Step 3
Once you have all the dummy joints set up, create the animation rig by hitting OK
If you want to cancel the rig, hit Cancel
This step will generate all the joints and controls for your character
Step 4
Select Skinning Joints will select only those joints you should bind your mesh to
Press this button, then select your mesh(es), then go skin>bind skin>smooth bind
In the option box, make sure you choose to bind to selected joints.
And that’s it! Just paint your weights, and enjoy animating!
And don’t you love it when instructions say “just paint your weights” 🙂