
After months of hard work, you have finally have all the image sequences on disk. So now what? With this page I hope to get you started with the conversions of a bunch of image sequences to a polished, professionally finished animation.
Editing: Adobe Premiere Pro
In Premiere Pro you work in a project. This seems similar to Maya, but it is not: the project is saved as one file, not as a directory with many sub directories and multiple scene files. Still, it can contain multiple edits or timelines.
The file-type is Premiere Pro Project (.prproj)
Just like texture images do not become part of your Maya scene but are referenced, the source material (a.k.a. Footage) does not get saved with the project.
On this page:
Setting up a Project
When premiere starts, you get the Welcome to Adobe Premiere screen. If you don’t have one already, choose New Project. Make sure to name your projects and set the Location to a place where you can find it again. You can keep the other settings at default, they can be changed later if need be
Workspace
The interface has many windows. Start by selecting the Editing workspace from the Window menu

The interface elements are described here, using an older version of the program: The Adobe Premiere Pro Workspace (at Media College.com)
Importing Images
To start, import media. In the Project window on the lower left, double click in an empty area of the project window will bring up a file requester (File > Import… or CTRL-i)

Select the first image of your sequence, make sure to check Image Sequence and hit Open. On the Mac the Image Sequence check-mark is hidden behind an Options button.
You have to make sure the images are imported at the right frame rate. You can see the framerate in the project window if you have the imported clip selected

If the frame rate is off, right click on the footage in the project window and select Modify > Interpret Footage. In the Modify Clip window that pops up, check Assume this frame rate: and type in 24. Hit OK to close the Modify Clip window

You can set the default framerate to 24fps in Edit > Preferences > Media > Indeterminate Media Timebase
Create a sequence
To create a sequence with the same frame rate and size as the media you imported, simply drag the clip onto the timeline.
Make sure to name the sequence: simply click on its name in the project window. You can also create a sequence by dragging the footage onto the new item icon (if you already have another sequence open in the timeline)
Basic Editing
An overview of essential tools:
- The Beat: An In-Depth Look at the Adobe Premiere Pro Editing Tools
- Make Use Of: The 5 Most Useful Tools in Adobe Premiere Pro
Exporting your movie
You can directly export an image sequence by selecting it in the project window, or whatever bin you put it in, and hitting CTLR-M (CMD-M on the Mac) or go to File > Export > Media
To export a sequence select it, in the project window or it’s timeline, and hit CTRL-M (CMD-M, export media)
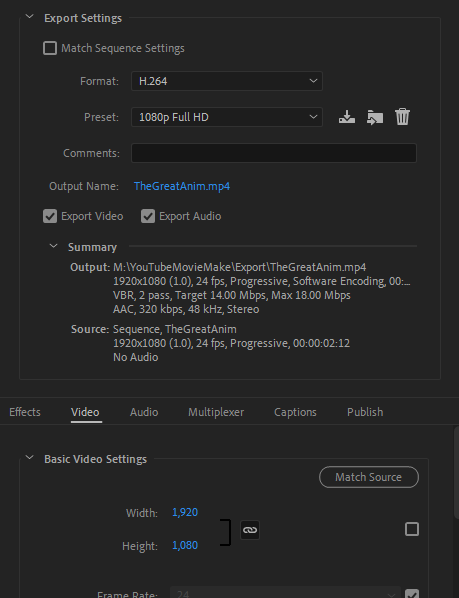
The Export Settings window will pop up. Usually you want to export with the following settings:
- Format: H264
- Preset: Match Source – High bitrate
- Premiere Pro does have specific presets for YouTube and
- Make sure to set the Output Name: click on the name and check which directory it will be saved in. In the file browser that pops up you can navigate to the appropriate folder to save the exported movie.
If you simply hit enter in the Export Settings window, the job will be sent to (queued in) Adobe Media encoder. This may give you additional codecs to choose from. Usually you want to hit Export in stead and have the movie exported directly from Premiere Pro.