
Set your render settings
In Render Settings → Common → File Output you can set the file name, image format, etc.
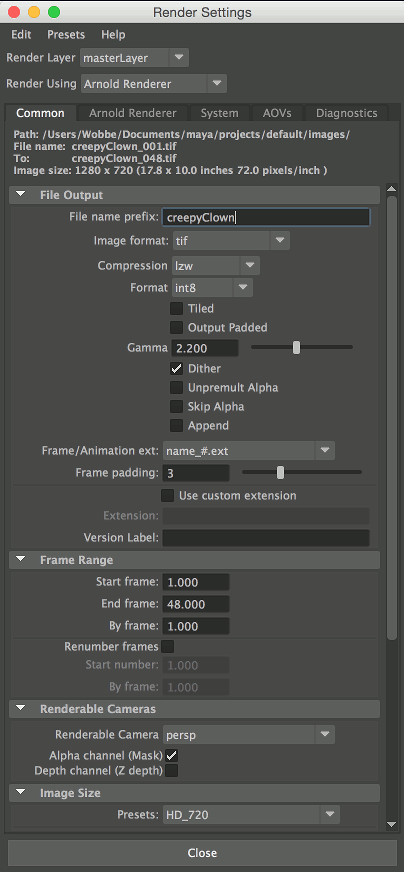
- By default Maya saves images rendered by Arnold in OpenEXR format. If you plan to use Fcheck to convert the image sequence into a movie file (see below) you should use a format that most programs can read, like TARGA or TIFF. OpenEXR is great for final renders on which you plan to perform post production, as it stores a much higher dynamic range.
- In order to render a sequence, you have to change the Frame/Animation ext from name.ext to one of the other settings: name_#.ext is a safe one that is properly understood by most packages.
- For short animation, using a Frame Padding of 3 will suffice.
This gets you an image sequence numbered myImage_001.tif, myImage_002.tif, …
At Frame Range you can set which frames are to be rendered.
Make sure you select the correct camera at Renderable Cameras.
At Image Size you can set the image size (duh).
Where does Maya save the images?
At Path at the top of the common tab you can see the location the files will get saved to. This is a project setting, but you can change this directly from the Edit menu of the render settings window. You can also go to your project settings (File → Project &→ Edit Current → Project Locations → Images)
Starting a batch render
From the rendering menu’s, choose Render → Batch Render and your render will start (look at the results bar at the lower right of your screen).
Once the render has started you can close Maya, which will free up memory. However, the only way to monitor your render then is by looking at the directory where the files are written. And the only way to abort is CTL-ALT-DEL
If batch rendering results in watermarked images, you do not have the required Arnold render license.
Rendering a Sequence
Rendering a sequence is an alternative to Batch Render that renders directly to the Render View window. It also does not require you to have a separate Arnold license and will render images without a watermark. You can not use Maya while it is rendering a sequence.
Images will be saved in the same location as batch rendered images. Make sure the Maya Render View (it does not use the Arnold render view) renders the correct camera before starting a sequence render.
Convert rendered image sequence to a movie file
If you have an older version of Quicktime Pro, loading the image sequence and exporting it as a self contained movie is the easiest way to convert an image sequence to a movie file. On PC, Apple unfortunately removed this capability after version seven. On the Mac, is still available with limited options.
On a Mac
NOTE: As of Maya 2020, FCheck is no longer available on Mac.
- Open Sequence in FCheck*
- File > Save as Movie
Produces Quicktime with Apple ProRes 4444 codec, which is rather big (file size wise) and will only play on Mac
- File > Save as Movie
- Open the exported movie in Quicktime Player
- File > Export
Choose 1080p (720p if your frames are rendered at that size)
Result: H264 compressed movie file
- File > Export
- Not available on Windows PC
* From Maya, you can use File > View Sequence to open Fcheck.
The application is located in /Applications/Autodesk/maya20??/Fcheck
Other options
To convert you image sequence into a movie file, you can load it up into your favorite editing program and export it.